Generate customized datasets for your demos featuring your audience’s name and logo that automatically hard reset before each demo without engineering assistance.
This guide outlines how to use Redactics to power datasets for demo environments with the following features/characteristics:
- Demo-specific customizations (such as using the name and logo of the company you want to demo to) generated as needed without the assistance of an engineer.
- Scheduled or on-demand dataset generation automatically hard reset before each demo to ensure that each new demo does not show data from the last one.
- Multiple datasets for multiple variants of demos you might want to offer.
Step 1: Prep Your Master Data
Get an engineer to setup a new environment with an empty database. This infrastructure can be reused for your actual demos, its use will be to host your master demo template data. You’ll want to integrate this environment with your CI/CD to support code updates/deploys as desired to showcase your latest and stable application build, and you’ll need some sort of domain pointed at this app (e.g. demo-master.yourcompany.com). Create an account within this environment for each demo variant you intend to give. Tweak this data for each demo to show what you want to show, but don’t worry about the company name, logo, or any customizations you wish to make for each demo you give. Consider this data your “start of the demo” data for internal use only. Each time Redactics runs it will hard-reset your demos back to this master data, plus any individual customizations you wish (more on this in a bit…)
Step 2: Prep Your “Digital Twin” Database Clone
Setup another empty database in this same environment (we recommend using the same database cluster), which we’ll use for running your actual demos. Each demo will feature data based on your template database reset for each demo — a clone or “digital twin” of the original, so that there is no residual data left over from the previous demo. You’ll need another domain to point at this application (e.g. demos.yourcompany.com). Do not start writing to this database, but ensure that your engineer that will be installing Redactics has the database connection information (i.e. hostname, username, password, database names) for both your master template and your empty demo database.
Step 3: Create Your Redactics Account
Have your engineer create your company’s Redactics account (or create it yourself and invite them to it). They will need to also create their first Redactics SMART Agent and workflow. Don’t worry about configuring the workflow for right now, the engineer simply needs to follow the instructions to install the SMART Agent with an empty workflow of type ERL (Extract, Redact, Load). You can give this workflow any name you like, e.g. “Demos”. They’ll also need to define the master database by clicking on “Add Database” in the “Input Settings” section. This will also require listing all of the tables used by the demo — this listing of tables will be copied over (and reset in your database clone/digital twin whenever the job runs). Once the SMART Agent has been installed it will report back to the Redactics Dashboard, and you’ll see a green checkmark in the SMART Agent section:

With this step complete, once you have established a working workflow and decide to update it later, the SMART Agent will automatically recognize these changes without a re-installation being required.
Step 4: Configure Your Redactics Workflow
Return to your workflow configuration, your Input Settings should already be completed. Then:
- Since this database data won’t include any sensitive information you can skip the “Database Fields Containing PII/Confidential Info” section.
- In the “Workflow Schedule Options” you can decide to put your data cloning/reset on a schedule. Please note that these times are in the UTC timezone (also known as Greenwich Mean Time or GMT), and custom times are expressed in crontab format. You can use this guide to format a custom time if you wish. You might want to start with running this jobs overnight (e.g. to run this at midnight UTC this custom time will be 0 0 * * *). For testing purposes your engineer can run these jobs manually whenever needed, and you can change this schedule whenever you want and have this recognized within minutes. The workflow usually takes a few minutes to run, so you can come back here and change the schedule to run shortly before your next demo.
- In the “Output Settings” leave “all table rows” set for each of your tables.
- Create your digital twin data feed by clicking on “Add Data Feed”, followed by “Create a PII-free Digital Twin/Clone”. Check the “Database Connectivity Should Be TLS/SSL Encrypted” checkbox if this is a technical requirement (and follow the instructions for enabling this if so), and leave “Enable Delta Updates” disabled.
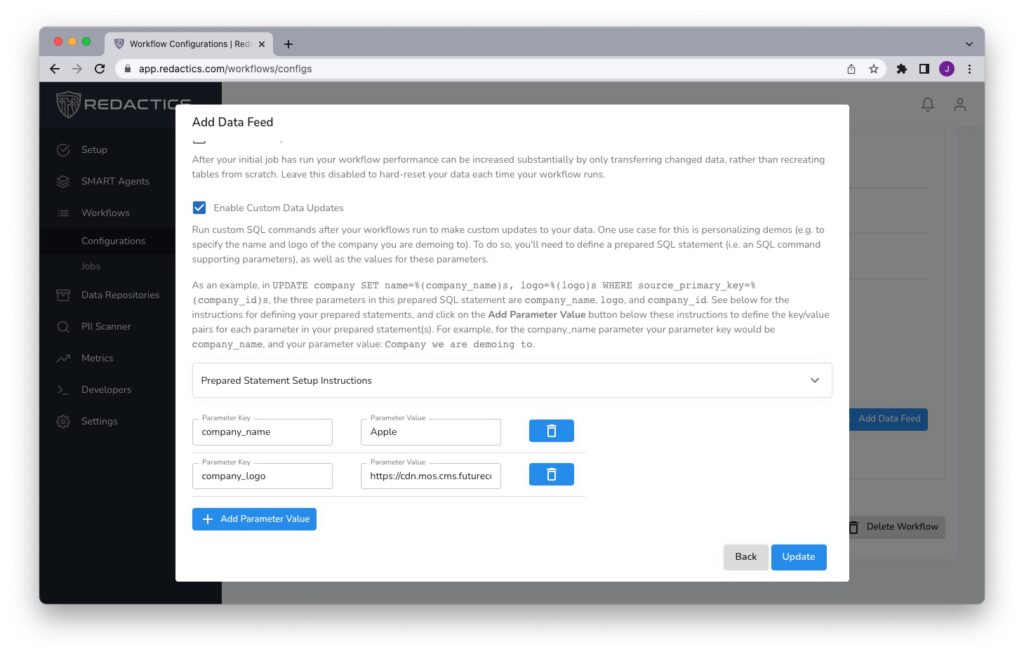
- Optional: If you are interested in making data customizations for individual demos, for example displaying the company name and logo of the company you are demoing to, you’ll need to have your engineer help out with one more step, and that is to create your prepared statements secret as per the instructions in “Enable Custom Data Updates” section. Your prepared statements are simply SQL queries needed for your data customizations, but unlike regular SQL queries they work based on parameters which you’ll provide here. For example, if your prepared statement is
UPDATE company SET name=%(company_name)s WHERE company=%(template_company_name)s, you’ll need to provide parameters forcompany_nameandtemplate_company_name. In this example the template company name will be the original company name from your template database, and the company name the name of the company you are demoing to. Whenever you book a new demo, simply come back here and change the value for company_name (and company logo URL and anything else you’d like to customize). - Once you’ve created your Digital Twin data feed you will be provided with instructions for adding the connection info for this database to your SMART Agent configuration (which will require a one-time re-install to inject and save this information).
- Click “Update”, and then “Save Changes”.
Now What?
Congratulations, your demo databases will be populated and reset as per your schedule, you are ready to start giving demos via your application that is configured to use your digital twin/clone database. Your product/sales people can return to the Redactics Dashboard to customize their next demo, and you can edit your master template data at any time and have this copied to your demo environment without engineering assistance. To ensure that you are good to go (because you probably don’t want to wait until your next demo to find out), you can either bump up your schedule or else have your engineer invoke the workflow manually via the Redactics SMART Agent CLI. Any issues with the workflow will be reported to the Redactics Dashboard, and, of course, you are welcome to contact Redactics Support if you require any assistance!
As workflows run, the progress will be reported to the Workflows -> Jobs page, and when this work has been completed a report will be provided detailing what was copied.